I Took The Handmade Pledge! BuyHandmade.org
Showing posts with label stationery. Show all posts

Wednesday, May 5, 2010

yet another addition to the DIY list

Early in our wedding planning we decided that we didn't need programs for the ceremony. Since I'm more than capable to do them myself, we knew it would be a DIY project and I just wasn't sure I needed to add another item to the long list of DIY projects we already had going.

But in my travels through the world of wedding porn, I fell in love with the idea recently. So now we're doing programs. Thankfully, we found a ton of helpful information on how to make accordion-fold programs. And the results of Mrs. Cupcake's programs convinced me that it was doable.

It's highly likely that ours won't be anywhere near as fancy as hers, but I'm looking forward to how they'll turn out. So far, I've successfully designed and ordered the fronts and backs in the form of postcards from -- who else? -- Vistaprint.


And in my totally biased opinion, I think they turned out great. Once again, we used the cute little owls that I purchased on Etsy and the rest of the design was super simple. Like the rest of our stationery, we opted for a whimsical design that could not be farther from classical. What can I say? Our obsession with cute owls overtook us.

We're still working on what we want for the actual content, but I'm leaving it until later. If it ends up being one of those projects that gets dropped off the list, I won't be disappointed. There's tons of other DIY projects that take priority over this one.

And after I finished my design work, I decided to leave the logistics to Mr. FP since he craves opportunities to make math formulas. Yep, he's one of those guys. Weird, I know. But funny. And cute. And damn useful when it comes to the wedding because I hate math. It hurts my brain. Literally.

Thursday, April 29, 2010

teaching our guests to share

After seeing this post, over on WeddingBee, I decided to steal yet another DIY project.

Photo sharing cards. Pretty much the best idea ever. It makes so much sense considering the fact that nearly every guest will likely bring a digital camera to our wedding.

Originally, we considered the idea of purchasing a universal card reader and setting up a photo download station right at the wedding with a laptop. We thought of having a friend look after the station and help guests get the photos downloaded. Although this may be a more effective method because guests won't have to take the time to do it themselves from home after the wedding, we decided we didn't want to ask any of our friends to sit at a table all afternoon and the security of the equipment also came into play.

Enter photo sharing cards. And with inspiration from the internet in hand, I once again set myself down in front of Photoshop to get the project completed. Thankfully, unlike our invitations, the design was simple and within a couple of hours, I'd put an order in with Vistaprint for 250 business cards with our design. And $7-ish and 2 weeks later, the result was met with smiles.


Instead of sticking with the same artwork that is on the rest of our stationery, we decided to go a different route for the stationery that will be around on the actual wedding day. So we purchased some clip art from an Etsy seller because there was no way I could manage to make those cute little owls myself. Mr. FP has a serious obsession with cute owls, so these ones were perfect and we decided to use them for our programs as well. (More on those, coming soon.)

Total cost for this project works out to about $13: business cards were FREE, plus $5 shipping and the clip art was only $5.95 and since its digital, there was no shipping costs. Sweet.

I really hope guests actually use these puppies because we're looking forward to seeing the photos they've captured on the big day. And we'd like to be able to see them somewhere other than on Facebook, with their crumby resolution. Hopefully, 250 business cards scattered around the reception won't be able to go unnoticed.

Monday, April 19, 2010

DIY: stationery struggles

Did I ever mention that I'm the most indecisive person ever? Because if I didn't, well, it's true. I'm pathetically indecisive. Even after making decisions, I'm indecisive. I doubt my choices and end up back at square one faster than you can say 'bob's your uncle'.

Case in point: RSVPs.

Remember how excited I was? How thrilled I was with our stationery choices? Well, I still am. For the most part. Floral design = love. Invitations are the same. But the RSVPs were bugging me.

They were the first of our stationery orders. Technically, they were our Vistaprint trial run. Before I knew how awesome the company was, I needed to try them out. And the cheapest way to do this was with the RVSPs. We'd always wanted postcard RSVPs so we went ahead and put the order through and we were thrilled with the result.

But I'd always had two major problems:
1) I thought the design may have been too overwhelming on such a small space

2) The postcards from Vistaprint have a glossy finish and that makes them a tad difficult to write on. Not horrible, but not great. And the more I thought about it, I didn't want our guests to have to use permanent markers just to fill them out.

So yesterday, I reordered them. Instead of postcards, we went with their note cards, which are the same size but they're available in linen finish to match our invitations.

The downside, they're more expensive. For 50, it works out to about $29. Although it's not ridiculous, it's more money that I wanted to spend to fix the problem. But I'm taking comfort in the fact that I like the design more and that guests will actually be able to fill out their names with the writing utensil of their choice.

After all, not every one is a sharpie fanatic like I am.
I don't know why they aren't, but hey, to each his own.

Monday, March 15, 2010

DIY: stationery pt. 3

The stationery saga continues. Sometimes I feel like it will never end. But I was really excited about this part because unlike our invitations, I didn't have to spend 8 months thinking about it!

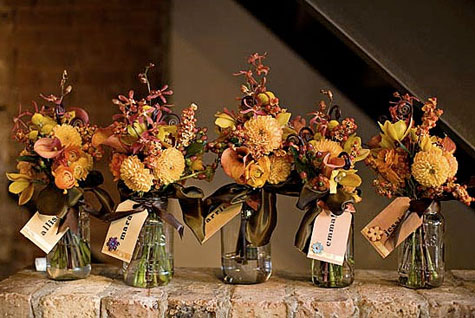
Early on in the planning process, I happened across photos of wedding stationery which featured the most gorgeous envelopes I'd ever seen. Until that point in the planning, I can't say I'd given the envelopes for our invitations a second thought. Or even a first one for that matter. I just figured we'd go with something simple, more than likely white, with hand written addresses. And then I started seeing more and more photos of wedding stationery that featured gorgeous envelopes like these ones:


{source}


After seeing photos like these, suddenly boring white didn't seem so appealing. I figured if our invitations are going to be amazing (in my totally biased and un-humble opinion) why shouldn't our envelopes be pretty too?

So I started sourcing out envelopes of all shades, hues, textures and shapes. I absolutely fell in love with the envelopes from Paper Source which come in just about every color imaginable. And then I took it one step further and fell in love with their envelope liners too. I soon realized I was in way over my head and falling in love with items well beyond our budget for stationery. To buy enough envelopes and liners in a size that fits out ginormous invitations and to have them shipped to Canada would have cost more than either of us ever wanted to spend. And that's another thing, since when is a 5.5 x 8.5" invitation considered ginormous? I have no idea, but envelopes for them seem to be impossible to find at a decent price. Maybe it's my cheapness, or the difficulty of getting them across the border, but I couldn't seem to find any in a decent color for a decent price.

I was ticked. There was no way I had spent the last 8 months of my life toiling over the invitations to have them exit my hands in ugly envelopes. So I thought maybe I'd settle for white envelopes and try making liners myself. After reading through a few online tutorials, I quickly realized how little I actually cared about envelope liners. Yes, they would be pretty. Yes, they would add something special to our stationery. But they weren't worth the money and they certainly worth the time I would spend stressing about making them. Ultimately, I moved beyond them. For the sake of my sanity (and by extension, that of Mr. FP), I'm glad I did. Because we found a great option that will make our envelopes both pretty and special. Plus, it throws in a little of the DIY and handmade touch we wanted our stationery to have without sending me to the crazy house.

And that option is a blank address stamp. More specifically, the cutest address stamp in the entire world. And let me tell you, it was no easy item to find. There are thousand of sellers on out there who make return address labels, but we didn't need one of those. I wanted a blank address label so we could fill in the names of our guests on the front of our invitations. I did end up finding this one, but Mr. FP wasn't in love with the ice cream cone and there's no lines for the address (a necessity because although I have really neat handwriting, my lines tend to tilt if I don't have a guide).

Finally, I came across Etsy seller narchitoo who carves rubber stamps by hand in some of the cutest designs. I'm so glad I came across her store when I did because she's in the process of liquidating her stock as she won't be carving any more stamps. She still has a few super cute stamps left, including this sewing one which I love:
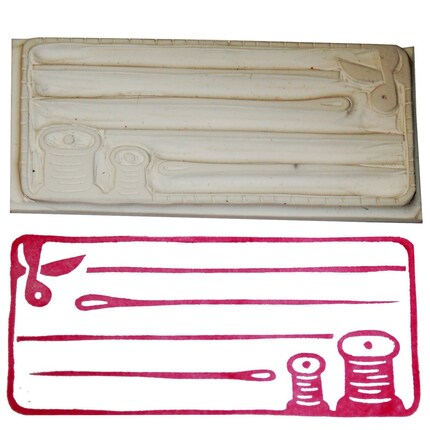
{click photo for listing}

Thankfully, we got in in time to snatch up her last owl address stamp.


Although $30 (with shipping) is more than I probably would have liked to spend on a rubber stamp, it's so cute and Mr. FP is in love with the owl. Plus, we'll be able to use it after the wedding, which is always a bonus with any wedding expenses.

Of course, as soon as it had arrived in the mail, we rushed (obviously by my choice, not Mr. FP's, he wasn't quite as excited ... he's such a boy) over to Michaels to get some ink pads to try it out. We ended up buying two different colors that coordinate well with our invitations because we (and by we, I mean I) couldn't pick just one.
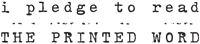

And after a few really unsuccessful trials, we finally started getting some good results. The biggest issue is finding an ink pad that is large enough to accommodate the entire stamp. It's about an inch too large to fit within the confines of most of the ink pads at Michaels, or at least, the ones that don't cost over $10. So it's slightly more difficult because we have to press it in a few times to ensure that the entire thing is getting covered, but it's worth it.


{click images to enlarge}

One of my favorite things about the handmade stamp (as opposed to most mass marketed stamps) is that the detailing is so clear and the image is a little different each time we stamp it. While the purchase of the stamp is yet another example of settling for something that's a few notches below our ideal stationery situation, the end result is something that's much more cost effective and much more us. Because, honestly, as pretty as Mr. FP thought the envelope liners were, he would have never gotten as excited about them as he did about this (I swear, it's something about the owl). Plus, I think we did our relationship a favor by choosing a project that isn't going to stress us both out for months on end.

So we love it. Regardless of the fact that, by the end of May, our hands will probably be permanently stained with red and blue ink. It's a good thing that owl is so darn cute.

Wednesday, February 10, 2010

DIY: favoring our guests pt. 2

I was talking last week about how many of our DIY projects haven't resulted in perfection but how, like the solution to the drainage problem (which Mr. FP is still so proud of), it still works for us.Turns out, the guest favors are a perfect examples of this.

Since getting engaged, I've known I wanted something simple for guest favors. And if it means he doesn't have to do anything, Mr. FP agrees. I had no desire to tulle pouches with Jordan almonds for the next year and a half so we settled on a favor that the guests can DIY themselves... a candy buffet.

As I mentioned here, the containers I wanted the guests to fill candy with don't come cheap. At all. I could literally find no local options. And the transparent, frosted take-out boxes that I wanted didn't seem cheap online either... or at least, not when I took into account that many of the companies that sell them don't ship to Canada.

Thankfully, I found a decent enough option at a local dollar store. The best part: they come in packs of 3 for $1. Um, could life be any better? Well, actually, yes, it could. The worst part about them: the packs are not consistent in color choice and I ended up with a variety of transparent, light pink and light blue.

Darn. These are not what I wanted. Close. But not perfect. My solution? Forget about the colors and spruce them up with some custom labels with our names and wedding date. Eureka!

With the help of the wonderful SassyCat on Etsy I bought these labels and customized them using the provided template. It took a while to design, but they're tailored to match the rest of our stationery. Plus, thanks to SassyCat who sent me a proof before she put the order through (which was definitely needed and allowed me to make small adjustments that the template hadn't accounted for) they worked out great. (For any one interested in taking a similar route, I would highly recommend SassyCat -- her prices are great and she's super helpful).


They're not perfect, but I love them. Considering the amount of other wedding stress we have to deal with all the time, when something like this is cost effective, pretty darn close to the original goal, and personalized, I'm pretty much on cloud nine. And Mr. FP is just happy when I make a decision because it means I will stop talking to him about it...

Monday, January 25, 2010

they have arrived!

Our invitations have arrived! And since I recently received permission from the creator of the artwork we used, I get to share them with the blog-o-sphere. After working on these puppies for the last... um, almost 8 months, I am ridiciulously happy to finally have them finished and ready to go. While I won't be entirely rid of them for a few more months, I am definitely looking forward to April when we get to send them far, far, far away. And now that it's over I have an incredible sense of pride for having created them on my own.

Okay, not really on my own. Not even close.
I have to give a big thanks to Etsy seller adrianneasu who sold me the original artwork which I modified to fit our style and personalities.

I also have to give kudos to Mr. FP, without whom this project would have been impossible. Not only did he teach me how to use Photoshop, but he spent endless hours listening to me freak out at my computer when things weren't going my way and trying to help me through the snags. More importantly, when I started to doubt myself, he spent time (probably more than he wanted to) convincing me that I was doing a good job.

Although the photos leave much to be desired, I've tried to do the best I can to give a sense of the quality. If my word means anything, I think they're top notch and I think it was definitely worth the $1.00 it cost to upgrade the paper for the invitations from glossy to linen finish.

I've also used the first photo to show off one my all-time favorite fonts (especially for wedding stationery) called "Feel Script". For a while, we were using Honey Script (another one of my favorites) to emphasize our names, date and location, but as soon as I came across this one, we both fell in love with it. The only sad part is that I have no idea where I found it. I know it's for sale online, but it was in a random pack of free fonts that I downloaded a while back and now I'm at a loss to find my resource for it. For those who are interested, I do know the rest of the font is called Libby Script and can be downloaded for free here.

{click images to enlarge}


And talk about an economical project! Thanks to VistaPrint.ca we were able to order 60 invites for $31.50 (since I get half price through e-mail offers) which also included free envelopes and an upgrade to linen finish. As for shipping, it only cost $10.10 because we opted for the slowest shipping time and although VistaPrint estimates that the process for what they call "slow shipping" should take up to 21 days, we received ours within 2 weeks. All in all, they cost us a measley $47.01 and while 8 months is longer than I would have liked to spent on the creative process (blame my indecisiveness, not me!), it was more than worth the time, effort and repeated yelling at my computer.

In addition to the invites, I designed RSVP's to fit VistaPrint's postcards as well as business cards with our wedding website which includes guest information, driving directions and information about the area of our wedding since it's out of town and unfamiliar for the majority of Mr. FP's family. And the cost for both of those projects was FREE, plus $15-ish for shipping.

I'd highly recommend that anyone with any computer and/or creative ingenuity take this route for wedding invitations. While many choose the 40-pack of invites from places like Michael's, we never had any luck finding a design that matched our personalities and I was a little scared about how much they would cost after factoring in ink. Not only did I enjoy (for the most part) creating our stationery, but they fit us perfectly, which my grandmother noted after seeing them for the first time by telling us that they were very me. And if, like me, your talents don't even come close to those of a graphics designer, there are tons of digital artists on Etsy who will sell their designs for you to personalize as you please.

Wednesday, January 13, 2010

101 DIY Wedding Projects

One of my favorite new lists of DIY projects came to me via Sara at 2000dollarwedding who found it via Stylish Events. It's an amazing list of 101 DIY Projects and Ideas for weddings and it can be found here. The best thing about this list is the way in which it's divided into categories so you can easily find a project for any aspect of their wedding.

Some of my favorites include the bouquet mason jars with handmade name tags which were used to hold the bridesmaids bouquets during the ceremony.


And from Martha Stewart weddings comes door monograms and two-minute corsages.


And some of the most special inclusions are the DIY Pocket Square Love Note and the DIY Bridal Party Survival Kit ... both of which I plan on attempting, in spite of the fact that my embroidery skills leave much to be desired!

Thursday, January 7, 2010

escort card envy

Please don't sit me at a loser table

Although I spent the better part of my last post mentioning that I was happy about not having to stress out over a seating plan, I still have a ridiculous collection of escort card inspiration stored on my computer. So in an effort to live vicariously through the brides that get to complete an escort card project, I've decided to share some of my favorites.


I'm shamelessly in love with the apple ones. So cute!

For those in need of further inspiration, The Knot has a ridiculous amount of escort card photos here.

Wednesday, January 6, 2010

musical chairs and dress-up


When Mr. FP and I first got engaged, I immediately went into what I like to refer as "bride-mode". I started scouring the internet for as many ideas as possible concerning every single detail of the wedding. After being engaged only a week, I was convinced that I'd made the final decisions on table linens, centerpieces, the guest list, the bridesmaids dresses etc. (Ha! "Final decisions". I've changed my mind about 340,093,787 times since then.) This "bride-mode" took over my brain and made me think strange thoughts. Although I've always known that I wanted a simple, small and (above all) casual wedding, I forgot all about my dream wedding because I was so consumed with what I thought a wedding had to be.

Once again, here's an example of the wedding industry at its best ... making people who are otherwise perfectly sane think they need to spend $30,000 on their wedding. As far as I was concerned, there had to be fresh cut flowers in my centerpieces, I needed to have a caterer, I had to get married in a church and I reception would have to be at a banquet hall.

Some of the biggest "ah-ha" moments I've had during wedding planning occur when I realize that I don't need to have any of these things. The first one occurred when I was talking to my mom about the seating chart and she suggested that it might be better to forgo escort cards and a seating chart entirely in order to promote the casual atmosphere of the wedding. The first thought through my mind? : "What do you mean? Not have a seating chart?! How can I possibly do that?!".

The second one came during my first visit to a bridal salon. I had spent the past half an hour sweating and maneuvering myself into giant, puffy wedding gowns that cost more than two months rent. I did not like it at all. I didn't want to spend $1,200 on a dress. I wanted to be able to move around without fear of knocking people over with the layers of tulle under my dress. And above all, I wanted the ability to pee by myself on my wedding day! It wasn't until the consultant at the salon brought in a bridesmaid dress that was similar to the style of gowns that I had hated the least that I remembered my original plan to order a bridesmaid dress in white in lieu of a gown.

Looking back on these moments, I feel so stupid. So unbelievably stupid. I'd been duped! From the moment that ring hit my finger, all those visions of a simple, fun, casual wedding that I really wanted flew out of my mind.

Thankfully, I ultimately realized (after an embarrassingly long time) that our wedding didn't need to have or be anything. And while I've been frowned upon for some of these decisions which go against the grain (from making my own bouquet, to doing my own makeup on the day, to not including the names of our parents on the invitations) it's been much more rewarding on the whole. When the day is done, we're planning our wedding, not the wedding industry's.

Thursday, November 19, 2009

Personalizing the Guest Book

There is nothing I hate more than boring guest books. Which, in my experience, is almost every guest book in the world. Okay, I'm exaggerating. But I do find them foolish. Why -- 20 years from now -- will you care what your guests' signatures look like? I know the main purpose it to record the names of the people with you on your special day, but why not make it more interesting than a single line per person? So in the past few months, I've been gathering some ideas and saving photos for inspiration. (By the way, a folder on my computer devoted to wedding inspiration = best idea I've ever had because otherwise I'd forget everything.)

One of my best resources for this, believe it or not, has been Martha Stewart Weddings. Although I have to take some of the advice on the website with a grain of salt since a lot of them are way more elaborate than what we need, it's been great for ideas that I can personalize to better fit our wedding. Plus, they've recently upgraded their "DIY Weddings" section, so it's more comprehensive.

Some of my favorite ideas from there, so far:


I really like the idea of having envelopes right in the guest book, but buying almost 100 tiny envelopes could get expensive and I'm not sure I want to commit to making them myself.

So I'm thinking we'll probably go with a combination of the last three. I'd like to have different colored cards for the guests to write on and then have them hang them on a tree similar to the one above. And when we get the photos of our guests at the DIY Photobooth printed, I can arrange them around the guest book tags from the tree. Because, while I like the idea of having the guests write directly into the guest book, like in the 2nd photo, I'm an organizational freak who would probably think the whole thing looked messy with everyone signing everywhere. This way, our guests will have more than single line to share their wishes with us. And I can be organized. What could be better?

Plus, I can make the tags myself. Easily. After seeing this photo from another blog, I couldn't resist buying an edge punch similar to the one in the photo. I got mine at Michael's for $12 (originally $18, but I rarely buy anything from Michael's without their weekly coupons).


So all I need to get is some card stock which is uber inexpensive and have a crafting night. Which will be like heaven to me.

For more ideas from Martha, there's a selection of 25 different guest books here.

Tuesday, November 17, 2009

DIY: Stationery Pt. 2

In my last post, I mentioned how easy out stationery endeavors have gone so far and one of the main reasons is for a great resource I only recently discovered. Although I'd heard it before, it wasn't until I got the recommendation from our wedding photographer (shout out to Julie for this one!) to try VistaPrint.ca

I was a little skeptical in the beginning because although they give you a preview of what the product will look like once it's customized, it's impossible to get a true understanding of the quality from a photo online. So we decided to do a trial run with our RSVP's. Although they have a ton of pre-made designs, I already had our design ready to go so I just changed the size of the photo to fit their template and uploaded it to the site. When we got them back, I was so thrilled that I decided to order some address labels and some business cards (that have a link to our wedding website; which we'll include with our invitations when they get sent out). For the address labels, we used one of their pre-made designs which you can use to customize your own caricature.

And their prices cannot be beat:

* 100 glossy/color (on one side) postcards (for RSVP's) are free, plus the cost of shipping, which was around $10
* 250 color business cards are free, plus $6 for shipping
* 140 return address labels are free, plus $4 for shipping

And if you sign up to receive their e-mail updates which come about once a week, there are a ton of other great deals. Invitations are slightly more expensive, but not nearly as pricey in comparison to the average cost of getting invitations made. We should be able to get around 100 for under $50 and that includes using our own design and upgraded to linen paper.

The only downfall is that since it's an online company, it's hard to see a definite preview before ordering so I recommend giving it a shot with something free before ordering something big like your invitations. But with their templates (which they have for every product they offer) it makes the process much more simple because you can make sure none of your design will get cut off.

I think they should hire me on as their PR lady. I'm so enthusiastic about them it's pathetic.

Monday, November 16, 2009

DIY: Stationery

Sorry I spent three seconds reviewing the wedding invitation you spent three months on

(If you haven't seen someecards, I highly recommend partaking in their hilarity.)

So far, one of the biggest ways Mr. FP and I have saved money on the wedding was on our stationery. When I started looking at invitations, I fell in love with the designs the sellers on Etsy had to offer. But with prices that ranged anywhere from $2.50 - 10.00 per invitation, there was no way I was going to drop that kind of coin.

I also considered buying a set of invitations which can be printed at home from places like Michaels or A.C. Moore but I couldn't find any designs that really appealed to me. Plus, when you factor in costs like buying a printer (if you don't already have one) and ink (who knows how much ink it'll take to print 100 or more invites) plus the cost of the actual invites which usually come in packs of 50 for somewhere between $30 and $60.

I know this is relatively cheap as far as wedding standards go, but I was determined to find invitations with a design that we loved and a price that I can live with.

Thankfully I did. With a little help from Mr. FP (okay, a lot of help) I learned how to use Adobe Photoshop and with a little practice (okay, once again, a lot of it) I finally got to the point where I could design our invitations myself. Yes, it took a long time, and yes, it was frustrating. But it was so worth it in the end. We now invitations no one else will ever have (a much better alternative to an "out of the box" option, in my opinion) and more importantly, we love them.

Getting them printed will be easy peasy (more on that in a future post) and this way all of our stationary can be fitted to match the invitations because I designed the artwork and can alter it to fit anything (so far we've done RSVP's, business cards with our wedding website on it and stickers for our guest favors).

Although I understand the hesitation to take on something like this in the months prior to your wedding, I highly recommend it if you have the time and if you're mildly crafty. I have a huge sense of accomplishment every time I see our invitations and I'm so excited to send them out to our friends and families. In spite of the fact that I started this endeavor in hopes of saving us some money, in the end, it had nothing to do with finances. We're both so in love with what we've created that I'm happy we didn't do it any other way.