I Took The Handmade Pledge! BuyHandmade.org
Showing posts with label decor. Show all posts

Thursday, May 19, 2011

DIY: Pom Pom Tutorial w/ Mr. FP's Formula

Hey all, long time, no see. I'm still alive, I swear. Unfortunately, the demands of university, marriage, and keeping apartment often interrupt my ability to stay connected with the blogging world. And although I'm not writing, I'm still reading all the lovely words from fellow bloggers about wedding planning, newlywed life, babies, and the challenges that come along with it all.

Today though, I have a good reason to write. I've been getting tons of comments and e-mails lately about the process of making pom poms for our wedding and the formula we used to alter the standard tutorials on the internet. In my original post on the subject of poms, I talked about Mr. FP's amazingness and how he managed to make a formula which allowed us to customize the size of our poms without ruining the ratio needed to make them look proportionate.


And after losing it once, then twice, then three times, I've finally recovered that formula and decided to commit it to blogging because 1) people have asked and 2) so I can never lose it again and Mr. FP won't have to have a heart attack every time I ask him to make it again from scratch.

So here we go. This formula is based on the original one found on Martha Stewart's website, here. That tutorial uses 20 inches as the width (w) and 30 inches as the height (h) and worked out in a formula, the original looks like this:

w X h
(h/3) x 2 = w
(w/2) x 3 = h

(30/3) x 2 = 20
(20/2) x 3 = 30

(little 'x' stands for multiply, just in case that's not clear)

With Mr. FP's formula you replace the (w) with a smaller number you want to use as width (because the width in the original is smaller than the height, obviously) and use h = (w/2)x 3 to get the bigger number that will correspond to the height.

For example, if you want to make one with 10 inch width, you need to use the formula to find the proportionate height or it will come out oddly shaped. So the formula would look like this:

(w/2)x3 = h

You know the width is 10, so you can input that, divide it by 2 and then multiply that number by 3 to get the height:

(10/2) x 3 = h

And when you work out the math, that gives you a height of 15. If you did it in reverse and knew you wanted a height of 15 and needed to figure out the width, you'd just use the other formula: (h/3)x2 = w ..... (15/3)x2 = w ..... (15/3) x 2 = 10.

And even with the formula, the process isn't easy. I played around with the numbers for a while before deciding which size worked best for us. I do remember liking the 10x15 size and one that was slightly larger but alas, I entirely forget the actual sizes we used. But never fear, the formula is here to help, at least a little.

Explaining it in writing can be difficult so if you are confused, don't feel bad. If you have any questions or need anything clarified, just let me know and I (and by I, I mean Mr. FP, math genius extraordinaire) will do my (his) best to explain more clearly.

Hope this helps! Happy pom pom-ing.

Monday, August 2, 2010

DIY: photo booth + templates

In the past year of writing this blog, I've talked about wedding photo booths about a gazillion times, as you can plainly see here.


When we came across the idea for the first time in the crazy world that is online wedding inspiration, we immediately fell in love with the idea. Couldn't get it out of our heads kind of love. I have a giant folder on my computer devoted to photo booth inspiration. We debated the use of props. We weighed our backdrop options. We thought of the perfect place to hang it.

In the end, it wasn't nearly as much work as I'd thought it would be. It consisted of a few simple mustaches on sticks and a backdrop which was fashioned out of our living room curtains. Tie it to a tree and weight it down because it was windy on our wedding day and voila! photo booth.

And thanks to our crazy family and some extra props provided by our photographer, the wedding day photo booth photos are now some of our favorites because they're simple yet hilarious.


(first 2 photos by our photographer; photo booth photos courtesy of Mr. FP's cousin)

We ended up asking a cousin of Mr. FP to man the photo booth with our camera and I'd highly recommend this method to anyone considering a photo booth. If you use a friend, you don't need to monopolize the precious time you have with your photographer on the photo booth. It's entertaining to guests if you plan on doing photos between the ceremony and reception like we did and let's face it, photo booth photos don't require much artistic creation from a professional.

Don't get me wrong, I've seen some very artsy photo booth photos and thought they were divine, but our favorites ended up being the simple ones with the backdrop centered and people standing in front of it. Nothing artsy. Nothing complicated. Nothing someone who has even a basic knowledge of cameras can't help you with. Just crazy people with mustaches.

Speaking of which, I finally compiled all those templates of mustaches like I'd promised and I'm included them below. Just click on the images below to enlarge and save the large, original version. They're sized to print on standard, letter paper but the size could easily be adjusted if you wanted bigger or smaller. (Feel free to let me know if you have trouble accessing them from this post because I could always try e-mailing them too.)


#1

#2

As far as the assembly process, I'd highly recommend that you don't attach standard printer paper directly to a stick because it'll likely be too flimsy and will damage easily. We traced them onto white card stock and glued felt on top, but you could also just cut out the mustaches from the printer paper and attach them directly to card stock if you wanted to forgo the felt.

The mustaches and mouth should be pretty straight forward, but I'd advise that you use extra caution when cutting out the glasses because they're more difficult. I'd highly recommend use a craft knife (I got mine at the dollar store) instead of scissors for those. And the dowels can easily be found at the dollar store as well; check the seasonal or BBQ section of the store because the ones we bought were actually supposed to be used as kabob skewers.

Happy 'staching!

Friday, July 30, 2010

our wedding: reception details

Mr. FP. Sure, he's a detail. Or, at least, his tie is. It was made custom by Etsy's toybreaker and everyone loved it. The boys sporting similar ones, but theirs were in black while his was charcoal. Want "tie that don't suck"? Check out toybreaker. I desperately need to get my hands on one of their silk scarves.


Hours, and hours, and hours, and hours were spent on these babies. I never want to see another piece of tissue paper so long as I live. Okay, that's a lie. But it will be a very long time before I make any more of these poms again. But it was worth it. In combination with the white paper lanterns, these beauties added a nice punch of color to the otherwise white space and we got so many compliments on them. Plus some requests from my sister's friends who simply must have some for their bedrooms. Thank goodness we had left overs. And the rest? They're hanging from our living room ceiling, forever reminding us of our wedding tent.


Mario and Peach. Read all about their creation here. I'm pretty sure our ring bearer was hoping we'd ask him to take our cake topper home with him. Tough. We're hanging on to this baby.


The reception flowers. One of the best ways we saved money. From the first months of our engagement, I was panicked about how much centerpieces would cost. $30 a pop? Times 12 tables? I mean, that's not expensive by normal wedding standards, but it could easily take up 1/8 of our budget. Ah, hell no. Thankfully, I came across the idea of potted centerpieces and fell in love with the idea. So I painted pots and we purchased the flowers two weeks before the wedding. We went with a mix of gebera- and dahlia-esque potted plants in a variety of colors and my grandmother was kind enough to plant and tend to them. Combine that with some gorgeous fabric and voila! centerpieces for under $6 each.


(guest photo)

Our fortune telling fish. The funniest novelty I'd ever heard of. When I came across them in HeyYoYo's Etsy shop, I had to have them for the wedding. Thankfully, Mr. FP concurred. Basically, they're supposed to tell the mood of the person whose hand they touch, depending on how their heads or tail moves. So if its head moves, you're feeling jealous. If its sides curl up, you're fickle. Etc, etc. Not an exact science, but hey, neither was our wedding.


We scattered them around the guest tables and were thrilled that people seemed to be enjoying them. Some people got so worked up by the results (especially when some members of the older generation kept getting "passionate") and they turned out to be quite the conversation piece. And even if fortune telling fish aren't your thing, you should definitely check out HeyYoYo; they have some seriously hilariously stuff, wedding or no.

Case in point.

(photo by yours truly)

(all photos by our photographer, unless otherwise stated)

Thursday, July 29, 2010

DIY: card box (er, cage)

In the months leading up to our wedding, we were struggling to find a suitable solution for a card box. Every single card box option we looked at was either boring, overdone, or cheesy.

And 3 weeks before the wedding, we were still at a loss. No card box yet no desire to settle for something ugly or traditional... which usually turned out to be one in the same for us. We were looking for something unique, something interesting. And if we got really lucky, we were hoping to have something that we could re-purpose after the wedding for apartment art.

In the back of my mind, I held the ultimate solution. A bird cage card box. Pretty. Unique. Re-purpose-able. Perfect.

Yet, after scouring Michaels, Winners, HomeSense, and even a couple TJ Maxx's during our trip to Florida, I had yet to find any trace of a bird cage. Actually, that's a lie. I found a really cute one at Michaels, but it was way too small. As in, couldn't really even fit a card in it kind of small, so obviously that wasn't an option. Sad bride.

Who knew that the solution to our problem would come from my parents' shed. The shed full of creepy spiders and the lawn mower also happened to hold the solution to our card box issue.

After explaining the issue to my mom and asking her to keep an eye out at any auctions or yard sales she attends between then and the wedding, she pulled out a weird kind of cage. It wasn't a bird cage, per se, and it was in three separate pieces, it had no real hole for inserting cards, and to add insult to injury, it was a really unfortunate color of brown. (I desperately wish I had a before picture to share, but alas, I do not. Just trust me, it was really bad. Like, photo booth chalkboard before the paint job, kind of bad.)

Nonetheless, I took it home determined to make it work. Somehow.

Problem #1: It's in 3 separate pieces: top, middle, bottom.
Solution: Twist ties.

Problem #2: There's no hole to insert cards.
Solution: Cut the skinny wooden dowels that held it together in a straight line to make enough room to insert a card.

Problem #3: It was brown. Really dark, really ugly brown.
Solution: Spray paint for any kind of surface in a really pretty shade of blue.

And yet, even after all this work, it still didn't look quite right. The cuts that I had made to make room for cards wasn't straight and it looked horrendous. Thank goodness for ribbon. Lace ribbon, in fact. What a life saver. My new motto? If anything ever looks strange, put ribbon on it.

Slap on a piece of paper attached to a chunk of card stock to let people know what it's for, and voila! card cage.


(all photos by me, except the first, which is by our photographer)

And the best thing about this option? We didn't even have to make space on a table for it. Because of the hook on the top, we were able to hang it like a real bird cage in the reception tent.
Here it is on the left, hanging up next to the gift table as the kids oogle at the candy buffet.

Typical.

(guest photo)

In the end, we never really solved our card box problem because didn't have a card box. We had a card cage. And although the twist ties we used to hold it together weren't a permanent solution (they lasted the entire wedding night, but gave way a week after the wedding when we tried to hang it in our apartment), it was a perfect last minute fix.

The total cost for the whole project worked out to about $10 since the spray paint cost $7 and the lace ribbon was from the dollar store.

Man, I love spray paint.

Friday, July 23, 2010

our wedding: ceremony details

Here's some more photos from the ceremony. We're so blessed to have had a photographer who took note of the details we worked so hard on for so many months. She's my hero.

Our ceremony musician, a friend of Mr. FP's and a local musician who did an awesome job. Or, at least, so I'm told. I was a little too focused on walking down the aisle to hear him. Pathetic, I know. He played "Today" as everyone walked down the aisle, which ended up being very appropriate since he openly admits to having a man crush on Joshua Radin.


Tree face! These bad boys are scattered all over the trees at the cottage and they're all unique and hilarious.


Our program attendant, sitting patiently. Thank goodness for calm children.


Our programs. I made 80 of these and I have absolutely no desire to ever do that again. The only consolation in the seemingly never-ending program assembly process? The cute little owls.


Our amazing handmade rings done by fabuluster on Etsy. We cannot thank Jess and Brent Williams enough for these pieces of art that we get to wear on our fingers. And I'm thankful to have some good shots of them because mine never quite did them justice. Read more about them in these posts.


Our rings in their nest. I think our ring bearer may have been a little thrown off guard when we told him he'd be carrying a nest, but he rocked it.


Our vow sheet which we shared. Complete with typo.


The chairs. Which took me way too long to set up. Good thing they're pretty, or else I'd hate them.


One of my favorite things about the ceremony, Mr. FP's feet. The choice of Converse had been much debated in the past (his dad informed him that he "can't get all dressed up in a suit and then wear sneakers"), but I'm so thrilled he wore them. I can't help but see a pair of black high tops and have them remind me of him, even though I know millions of people wear them. But, hey, I'm not alone in that. My little cousins once saw me wearing Converse and proceeded to make fun of me for wearing Mr. FP's shoes. Because, of course, no one else in the world wore them as far as they knew at the time. I love kids.

Thursday, July 15, 2010

our wedding: the tents

I've said it before and I'll say it again: no matter how much preparation we did during our year and a half long engagement, the days leading up to the wedding were still insanely busy and stressful. I sort of saw that coming, but experiencing it first hand is... insane? unbelievable? something that made me think more about why we didn't elope? Well, let's just say that it's a whole new game.

And yep, for us, the morning of the wedding was like a whole new game. We'd been planning like crazy, but pulling it all together is more work than I was mentally prepared for.

We were up at 7am on the morning of the wedding and rather than wake the wedding party and the rest of our friends who had spent the night before the wedding at the cottage, Mr. FP snuck out to lay out the linens, centerpieces, and tent decorations. Looking back, this probably wasn't such a good idea. It was awesome because it gave us a head start on the day's work. But it was a bad idea because I'm cranky in the morning. And with all the accumulating stress of the past few days, I was even crankier. So we got a lot done, but we were a little snippy with each other. Can you say bad start to the wedding day?

On the plus side, the linens, tables and chairs from the rental company were exactly what we'd ordered and we encountered no problems there. Other than the fact that we dropped one of the white linens on the ground while we tried to put it on the table. Grass stain central. Good thing we had ordered extra. And instead of renting linens for the rectangle food/gift/guest book tables from the same company, I decided to buy some vinyl ones which has been on sale at a local grocery store a few months back. Although they didn't drop to the floor like the rentals would have, they cost $8.99 to buy versus the $17.99 it would have cost to rent. Plus, they had a pretty blue argyle pattern which is much more attractive to me than plain white. Score. Especially since I'm hoping to resell them through a local classified site. Here's to hoping someone out there has a wedding coming up.

(photo by one of our guests... than you, Flickr cards)

Our table cloths in action. Pretty, pretty. The only downside is the fact that vinyl wrinkles like mad, so by the end of the day, they weren't as pretty as they could have been. But for a savings of almost $10 for each, who the hell cares?

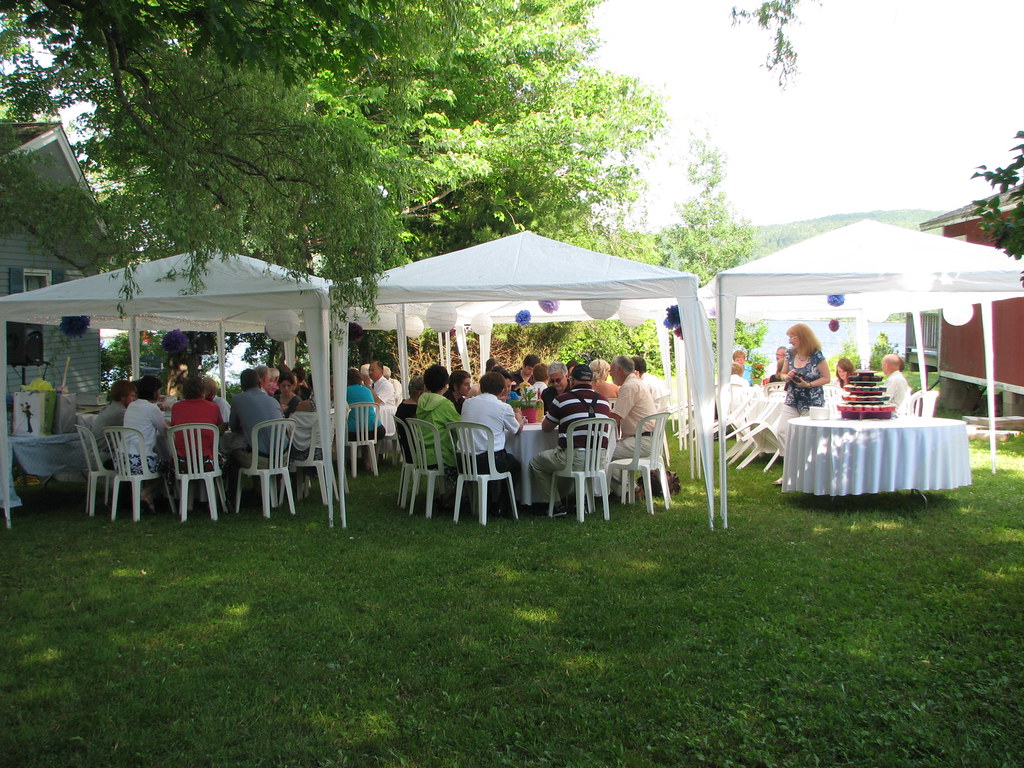
Soon thereafter, our friends starting coming to and began to help us. By 11am, we had the tent entirely decorated with pom poms, paper lanterns, centerpieces, linens and twinkle lights. I say that like it was easy. It was not. The night before, my sister, brother, his girlfriend and I were desperately attempting to fluff out a ridiculous amount of tissue paper pom poms (some more successfully than others; my brother seems to have a hidden talent for it) and tying string to paper lanterns. That morning, we were a rotating mess of tape and fishing line as 6 people attempted to evenly space out the poms and lanterns. That part didn't exactly turn out how I would have liked but only because I would have preferred a tent entirely covered in hanging decor. Pretty? Yes. Practical and worth the time? No. It took a whole lot of people and a whole lot more time that I would have liked, but it was finally done.

And when we'd finished, I honestly couldn't believe it. Planning out how we wanted the tent to look for a year is one thing, but seeing it executed almost exactly how we'd pictured it was ridiculously fantastic. For me, it was an affirmation that we'd completed our plan for the tents but for Mr. FP, it was a full on shock. He told me later that he never actually understood how the reception tent plan would happen. He'd listened over the months and helped me pick out colors and fabrics, but his knowledge of tent decor pretty much ended there. So as much as he'd encouraged my vision and inserted his opinion, he wasn't so sure how it would work out.

And as stressful and frantic as the execution was, I remember looking at the tents and being elated that all our guests would be sitting beneath them in a matter of hours as we celebrated. Small moments like that make the hours of tissue paper folding worth it, let me tell you. (Not that I would ever want to do that much folding again.... ever).

(photo by my nana, the photo-taking fiend of the family)

Tuesday, June 22, 2010

DIY: photo booth props

For months, I have been seriously obsessed with the idea of having a homemade photo booth at our wedding. As you can plainly see here. For weeks on end, I spent time trying to figure out what I wanted for our backdrop only to decide that a quilt was probably more work than I wanted to take on and that buying how ever many yards of fabric we'd need would be too expensive.

One day, I was sitting in our living room absentmindedly looking out the window when I got a most unexpected burst of inspiration. Curtains. Yep, that's right, I said curtains. I love the curtains in our living room. They're just simple, boring curtains as far as the shape and style goes, but the lovely sea foam color is one of my favorite things in the world. And the more I thought about using them as our photo booth backdrop, the more I liked it. The color works great with the green surroundings of the cottage, since they're curtains they have a built in method of hanging and best of all, they're free!

So there, backdrop... check.

Now, onto props.

I considered purchasing some, but obviously I had to take a crack at making them myself first. Like tons of couples before us, we were obsessed with the mustache idea. And with a little help from Martha, they were easily accomplished by using a template which can be found here. In addition to those in the template, I crafted a few of my own as well as some lips and glasses.

Turns out, this was a simple DIY. I printed off the template a couple of times and cut them out on card stock. For some added flair, I added felt because it's fuzzy and tickles like a real mustache. And the glasses were made even fancier through the addition of some beads and/or pearls. Then I hot glued each 'stache to dowels which I found at a local dollar store.


Total cost for this project was ridiculously cheap:
  • 12 pack of dowels : $1
  • Felt, card stock, hot glue and beads were all free because I already had them
  • two hours of my time
Total cost: $1

A dollar! Combine these with the chalk board and we have got ourselves a serious winner. Holy cheap and easy DIY project, batman. I would highly recommend it to any couples interested in photo booth props. I know there's tons of people selling them online, but they were ridiculously easy and would be do-able even for the crafty handicapped.

As an added bonus, here's Mr. FP's favorite. He models it all the time. In doing so, he ends up looking like a combination of Tom Selleck and Colonel Sanders.


Oh Magnum P.I., he's so dreamy.

EDIT: After lots of reader requests, I figured I should include the link to my own templates in this post as well. You can find them here. Click on each image to get a full size file.

Tuesday, June 15, 2010

woodland envy

I am ridiculously in love with this Etsy treasury list.


If I could reverse time and go back a year and a half, I may have put all my energy into advancing the woodland wedding theme. I love it a little too much.

Wednesday, June 9, 2010

pom poms and lanterns

As I've discussed before, the decor for the ceiling in our reception tent will alternate between paper lanterns and pom poms. Only recently have I finally been able to eliminate the ridiculously large stack of tissue paper that's been sitting on my dining room table for months by turning them into pom poms. Thank goodness that's finally over with. As far as monotonous DIY projects, let me tell you, this one tops my list for sure. Once the novelty of the pretty colors wore off, I was faced with a daunting task and although I probably should have enlisted the help of my bridesmaids for this one, it was good that I overcame the monotony factor to get them done myself. After all, I realized I had enough time (after I spent half a day watching episodes and episodes of Gilmore Girls), I just need the motivation.


Yes, I color coded them... it's the Type A in me.

Such a small box, such a huge pain in the ass. They are now ready for transport and will await fluffing until a day or two before the wedding. That's the easy part, after all.

Thankfully, the other half of our ceiling decor has been a much more enjoyable process. Paper lanterns are simple. Especially since I stumbled upon paperlanternstore.com a few months back. They have a ridiculously amazing selection. Every color, every size and you can even choose between regular and irregular ribbed... how awesome is that? I'm semi-depressed about our choice to go with all white lanterns because I would have loved to choose tons of colors from their extensive inventory. When I expressed this thought to Mr. FP he reminded me that color poms and color lanterns would probably be a color overload. Then I reminded him that there's no such thing. The he ordered the white lanterns. Story of my life.

The prices seem comparable to other places online and a big bonus for us was the fact that their shipping charges to send the orders to Canada were extremely reasonable. And after ordering, we received the order within 2 weeks.

But my favorite thing about dealing with them was the fact that when the 14" lanterns that we wanted weren't in stock, they promptly replied to my e-mail inquiry and let me know when that size would be in. Plus, they sent another e-mail to let me know that they had received their latest inventory and that I would now be able to order the correct size. Coming from someone who is used to crappy communication from online stores and from eBay sellers, this was a real pleasure because we didn't have to sit around wondering whether or not they would ever have the right size.

So if you're one of the many brides or grooms looking for inexpensive paper lanterns, I'd highly recommend that you check them out because they worked out awesome for us. And if you do buy from them, please buy colored ones, so I can live vicariously through you.

Wednesday, May 19, 2010

judgemental judiths

After reading a post from Cupcake Wedding and the comments which ensued, I got to thinking about how much pressure is placed on brides during a wedding.

I know, I know, you're thinking "Well, duh, of course there's tons of pressure! It's a wedding!". But hear me again: think about how much pressure is placed on brides during a wedding. Not the couple, the bride.

As Cupcake discussed the aesthetics of her wedding, I got to thinking about how worried I am about the aesthetics of ours and how judgmental will be. Like Cupcake says, chances are, the judgement of others will fall upon the bride instead of the couple. As I've discussed before, the all-too-common assumption that the bride is the only one who really cares about the wedding bugs me. A lot. And this is especially true for the aesthetics of a wedding. The majority of people in society assume that the groom had little to nothing to do with the decor selections featured in a wedding. So, if the decors sucks, who do they blame? Yep, you guessed it, the bride.

Coming from a judgmental/gossip-y family, this concerns me. Some aunts have already expressed their resistance to the fact that the wedding will be held at the family cottage. Some have a problem with cupcakes instead of cake. And others are concerned about my desire to do my own hair and makeup. So I can only imagine what kind of crap I'll have to deal with when the wedding actually happens. I can practically already hear the judgments.

On the other hand, Mr. FP remains unaffected by these worries. No surprise there because he doesn't think about things nearly as much as I do. Yet, it's more than that. Even if he were one of those grooms who was concerned with the aesthetics of the wedding, chances are he wouldn't have to hear about it. Aunts wouldn't harass him with questions about decor or wardrobe. People simply don't trace poor aesthetic choices back to the groom.

And it stinks. Because although he's not as concerned about decor as I am, the wedding will reflect joint decisions. Universally so, in fact. I don't think there's been a single decision made that wasn't preceded by a discussion. Hell, I even got his input on what kind of veil I should wear and how I should wear my hair. Does he worry about these things like I do? No. But he was there. He helped make the decision but at the end of the day, he'll be absolved of any guilt.

Thankfully, in spite of a few judgmental family members, our wedding guests will be supportive on the whole. When I was worried about how his family would receive a wedding hosted at a summer cottage, he assured me that they would be thrilled. Similarly, our non-traditional aesthetic choices have been well received on the whole so far. Our invites were a big hit and that gives me hope that we won't have to hear as many complaints as I initially thought.

And as much as I'd like to say that the judgements doesn't affect me in the slightest, they do. Albeit, not enough for me to conform to the standards of traditional weddings by picking a palette of 2 colors, have a traditional cake and stick with traditional decor like flowers and tulle. But still, the worries are there. Although I know it's not realistic, I'd like our guests to love our wedding as much as we do. I'd like them to enjoy the day and forget about the colors, the decor and the location. *Sigh*, in a perfect world...

Tuesday, April 20, 2010

Exciting news! I recently received an offer to become a wedding expert over at Wishpot, an online gift registry website.


Let's face it, wedding expert I am not.

An expert purchaser of things online, on the other hand, I most definitely am.

I've been having a ridiculously good time finding things to add to my lists, which you can see here. Let's face it, this is just feeding my online shopping addiction. Especially when it comes to the wedding. But hey .... ... um, never mind, there's no excuse for that one. It's feeding the addiction.

And I like it.
Check it out and see for yourself, fellow shopping addicts.

Tuesday, March 9, 2010

wedding cake and video games

So I've already posted about how Mr. FP has been the executor of many wedding choices. Well, one of those decisions came in the mail last week and we're so excited!

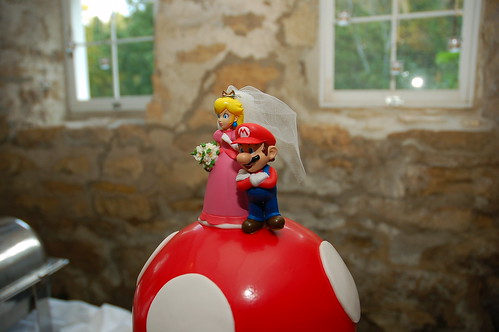
Our Mario and Peach cake toppers have arrived! They're cute, colorful, unique and totally us so we love them to bits. Although we're doing cupcakes, so technically, there's no cake to top, we wanted something to go on top of the cupcake tower. And since we're anything but traditional, the standard cake toppers didn't seem to fit us. Plus, he's got an Arab background so he's brown, not white and not black. And that translates into being impossible to recreate in cake topper form in today's wedding industry, apparently. Our only choices have been a very white or a very, very black cake topper man. I know there's tons of people on Etsy who will customize cake toppers to look just like bride and groom, but honestly, the idea of seeing a mini version of us perched on top of a cake kinda freaks me out.

It wasn't until Mr. FP found this cake that we knew what we wanted to do:


{source}

Although I'm sure Mr. FP would have loved to have the entire cake recreated for our wedding, we knew we wanted cupcakes, it was out of the budget and we weren't sure we'd be able to find someone in our area who could do it justice. So we settled for the cake toppers. That's right, we settled. It wasn't our dream wedding cake situation, but we're making it work. But that's fine with me, because I love our little video game heroes. Well, hero and stereotypical female who needs a man to save her. Oh well, we'll just ignore that part for now and focus on how pretty they are.


{click images to enlarge}

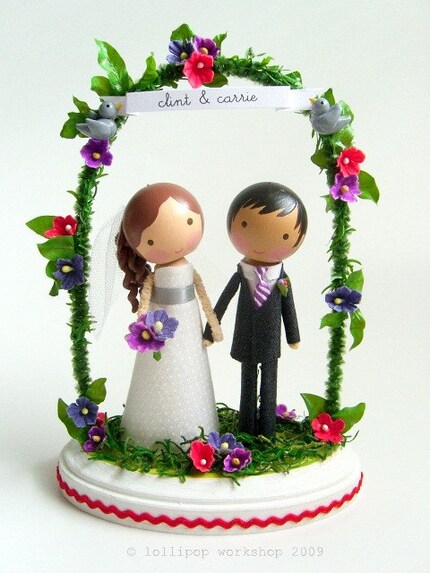
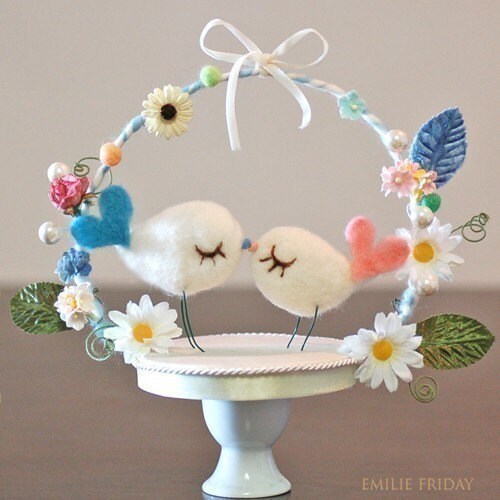
And, of course, like many projects in our wedding, these guys still have some DIY awaiting them. They're fairly small in comparison with the standard cake topper and they're separated by two different bases, which I'm not a huge fan of. So they'll eventually get removed from their bases and placed on a single base upon which I hope to be able to create some sort of arch to surround them. Ideally, I'd like them to look something like the cake toppers below (both of which I love), complete with arch and decorations.


{click images for listings}

Overall, the cost should be minor. Mario and Peach were found on eBay for under $8 each, a base shouldn't be more than $5 and I'll use decorations I already have in my extensive collection of crafting material.

So, unless Mr. FP breaks an arm off Mario or Peach we'll be good to go.

But honestly, I don't have much faith in that considering the fact that the first thing he did after we opened them was make them fight. That's right, he pitted Mario and Peach against each other in a fist fight. At which point he astutely noted "Hey, did you ever notice that the first things boys do with action figures is make them fight?"

Yep, that's my future husband I'm talking about...